Jupyter Lab Installation on Ubuntu
JupyterLab is like a magic lab for data scientists, researchers, and engineers—a flexible, interactive workspace where you can write code, visualize data, and document findings all in one place.

Introduction
JupyterLab is your go-to environment for interactive data analysis, blending notebooks, text editors, and terminals into one seamless workspace. It’s like having a digital laboratory where you can experiment, visualize, and document all in real-time. Firstly, this guide will walk you through a hard setup, then we will move on easy setup to get you started swiftly. Using Docker Compose, you can quickly set up JupyterLab on Ubuntu without the usual setup headaches.
JupyterLab: The Ultimate Workspace for Data Science
A Versatile Workspace for Every Language
Imagine JupyterLab as your go-to lab for data science and research—a place where you can code, visualize data, and jot down notes all in one spot. It supports multiple programming languages like Python, R, and Julia, making it incredibly flexible for different tasks. But, juggling between these languages can get tricky, especially since some have better support than others.
An Integrated Environment for Smooth Workflows
One of the best things about JupyterLab is how it brings everything together. You can write code, see your data visualizations, and take notes all in the same workspace. This integration helps you work more efficiently, but if your project gets big, the interface can start to feel a bit crowded, and you might miss out on some of the advanced features you get with traditional IDEs.
Customizable with Extensions
JupyterLab’s extensibility is a real game-changer. You can add various plugins to tailor the environment to your needs, whether it’s for version control, enhancing visualizations, or other functionalities. However, not all plugins are perfectly maintained, and some might not work with newer versions of JupyterLab, so you might need to tweak things yourself.
Interactive Visualizations Made Easy
One of the coolest features of JupyterLab is its ability to create interactive visualizations. You can use libraries like Plotly or Bokeh to make your data come alive right in the notebook. Just keep in mind that if you’re working with very large datasets or complex visualizations, things might slow down a bit, which can affect your workflow.
Scalability and Performance
JupyterLab is also great for scaling up. Whether you’re using Docker or running it in the cloud, it helps ensure that your setup remains consistent across different environments. However, while it scales well, handling massive datasets might cause performance issues, and setting up the necessary infrastructure can require some extra work.
Overall, JupyterLab is a fantastic tool that simplifies data science and research, making complex tasks feel more manageable and engaging. After examine pros cons of jupyter lab let’s continue with installation approaches..
Method 1 : Manual Installation on Linux Debian
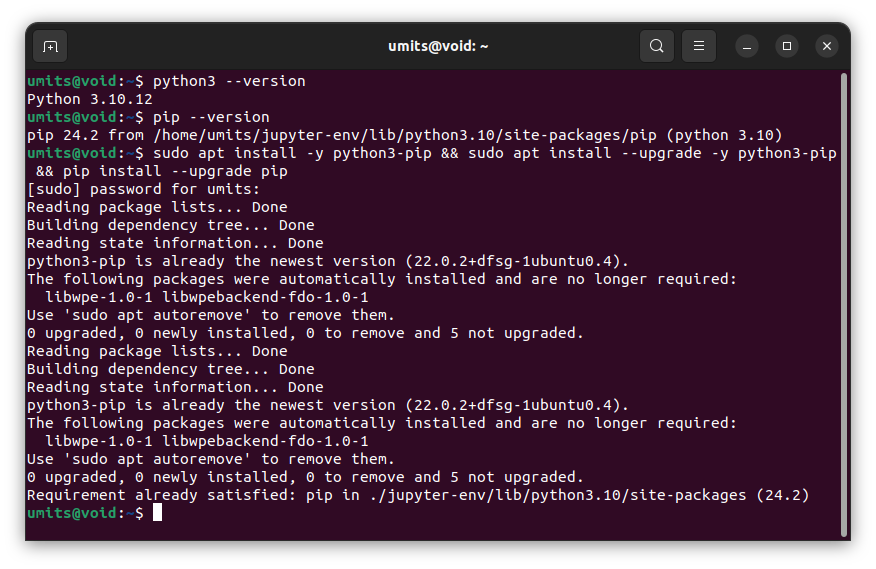 Figure 1
- Step 1 — Check python version
python --versionorpython3 --version. If it is not installed, then install. - Step 2 — Check pip version
pip --versionIf it is not installed then install pipsudo apt install -y python3-pip. If it is already installed runsudo apt install --upgrade -y python3-pipandpip install --upgrade pipcommands for updating. - Step 3 — Install virtualenv package
pip install virtualenvto create virtual environment. Then create virtual environment likevirtualenv jupyter-venv. After that activate the virtual environmentsource jupyter-env/bin/activate.
 Figure 2
- Step 4 — Install Jupyter Lab
pip install jupyterlab. - Step 5 — Find jupyter-lab path
find ~ -name jupyter-lab - Step 6 — Add PATH
echo "export PATH=$PATH:~/jupyter-env/bin/" >> ~/.bashrcand after that reload bashrcsource ~/.bashrc. Then if you need, activate jupyter-env again. - Step 7 — Set password
jupyter-lab password.This step set password and also generate a json file include hashed password.
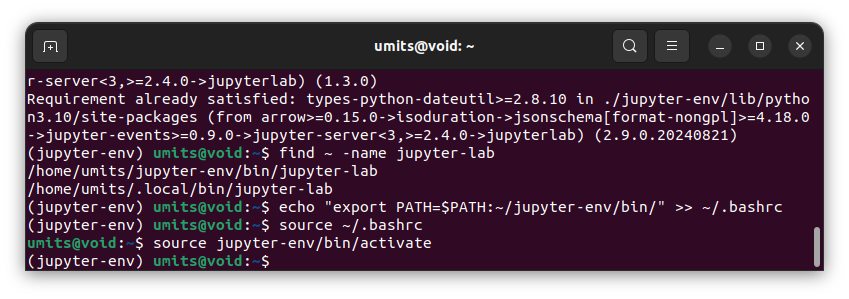 Figure 3
- Voila! Now, you can run your Jupyter Lab with
jupyter laborjupyter lab --ip="localhost" --port=8888 --no-browser --allow-root.
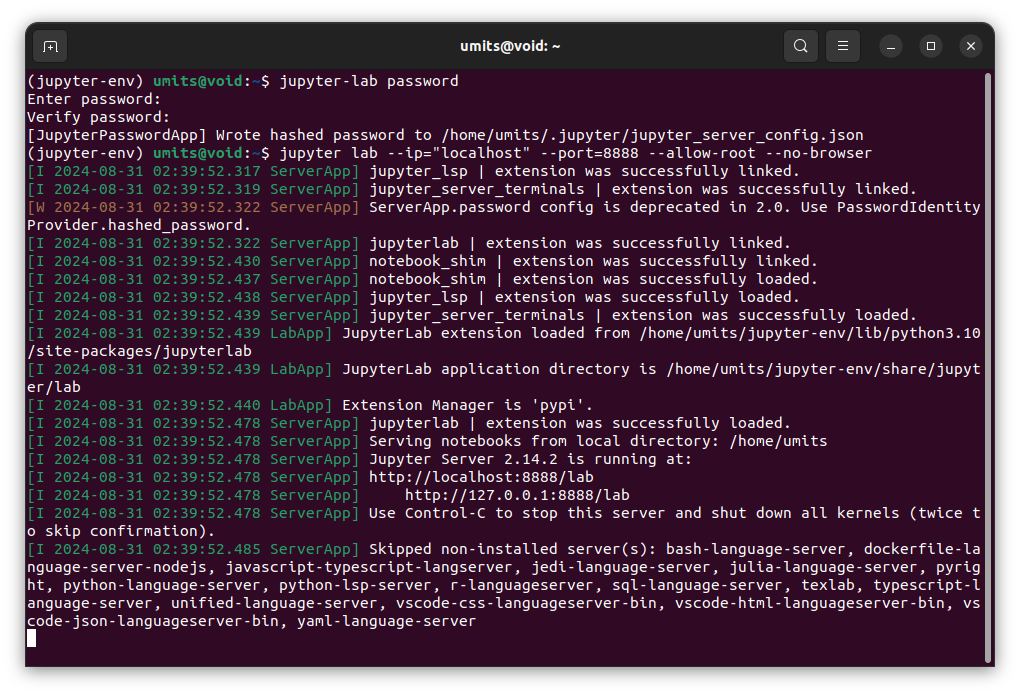 Figure 4
You can login Jupyter Lab localhost:8888 . If you changed ip or port address or port is already used you can see in logs after started Jupyter Lab like in Figure 4.
- Let’s do better this installation.
- Step 8 — Let’s control our configurations on a file, so we can manage Jupyter Lab easier
- Step 8.1 — Generate config file
jupyter-lab --generate-config - Step 8.2 — Generated password is written a
jupyter_server_config.jsonfile. Hashed password will be use next step. Step 8.3 — Open generated
jupyter_lab_config.pyfile and update these lines according to your needs.1 2 3 4
c.ServerApp.ip = 'your-server-ip' # default localhost c.ServerApp.open_browser = False # default false c.ServerApp.password = 'hashed_password' # generated hashed password c.ServerApp.port = 8888 # default port is 8888
- Step 8.1 — Generate config file
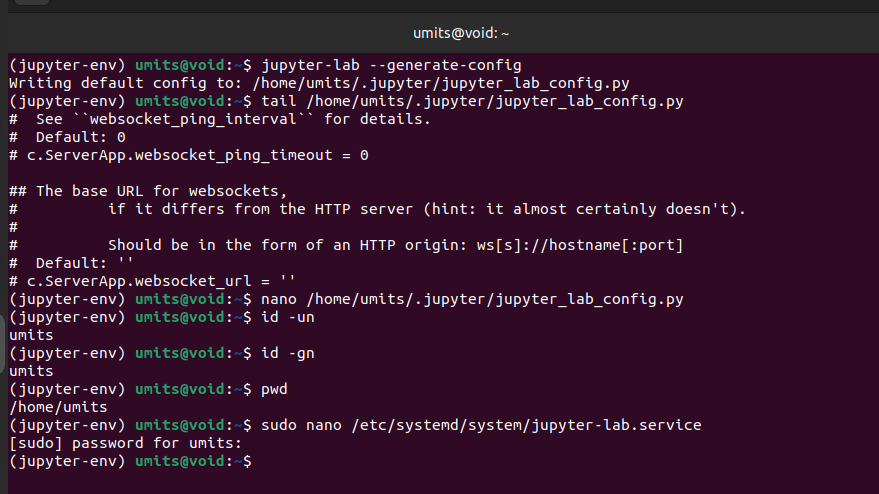 Figure 5
- Step 9 — Create a service for Jupyter Lab,
- Step 9.1 — Create a services file with
sudo nano /etc/systemd/system/jupyter-lab.service - Step 9.2 — Configure this file according the your username and jupyter-lab environment path etc. You can learn jupyter lab path with
find ~ -name jupyter-lab, your user nameid -un,your group nameid -gn
1
2
3
4
5
6
7
8
9
10
11
12
13
14
  [Unit]
  Description = JupyterLab Service

  [Service]
  User = umits
  Group = umits
  Type = simple
  WorkingDirectory = /home/umits/
  ExecStart = /home/umits/jupyter-env/bin/jupyter-lab --config=/home/umits/.jupyter/jupyter_lab_config.py
  Restart = always
  RestartSec = 10

  [Install]
  WantedBy = multi-user.target
- Step 9.1 — Create a services file with
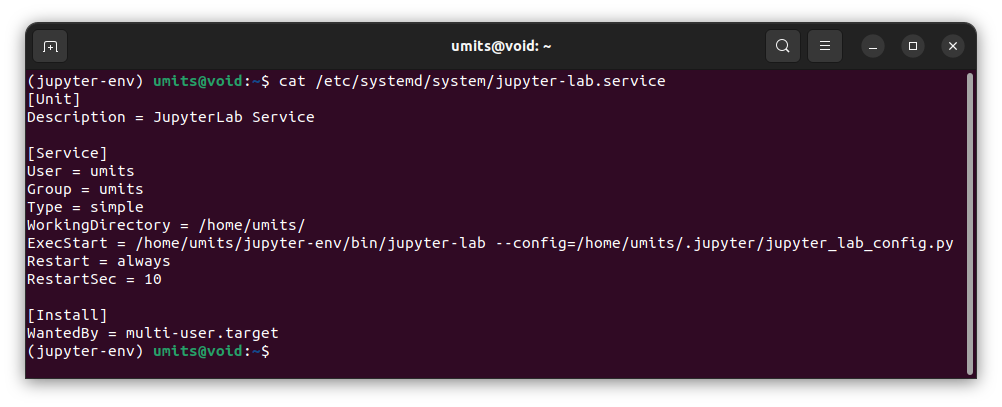 Figure 6
1
2
3
- Step 9.3 — Reload system daemon `sudo systemctl daemon-reload`
- Step 9.4 — Start your new Jupyter Lab Service `sudo systemctl start jupyter-lab.service`
- Step 9.5 — Check your service status is running `sudo systemctl status jupyter-lab.service`
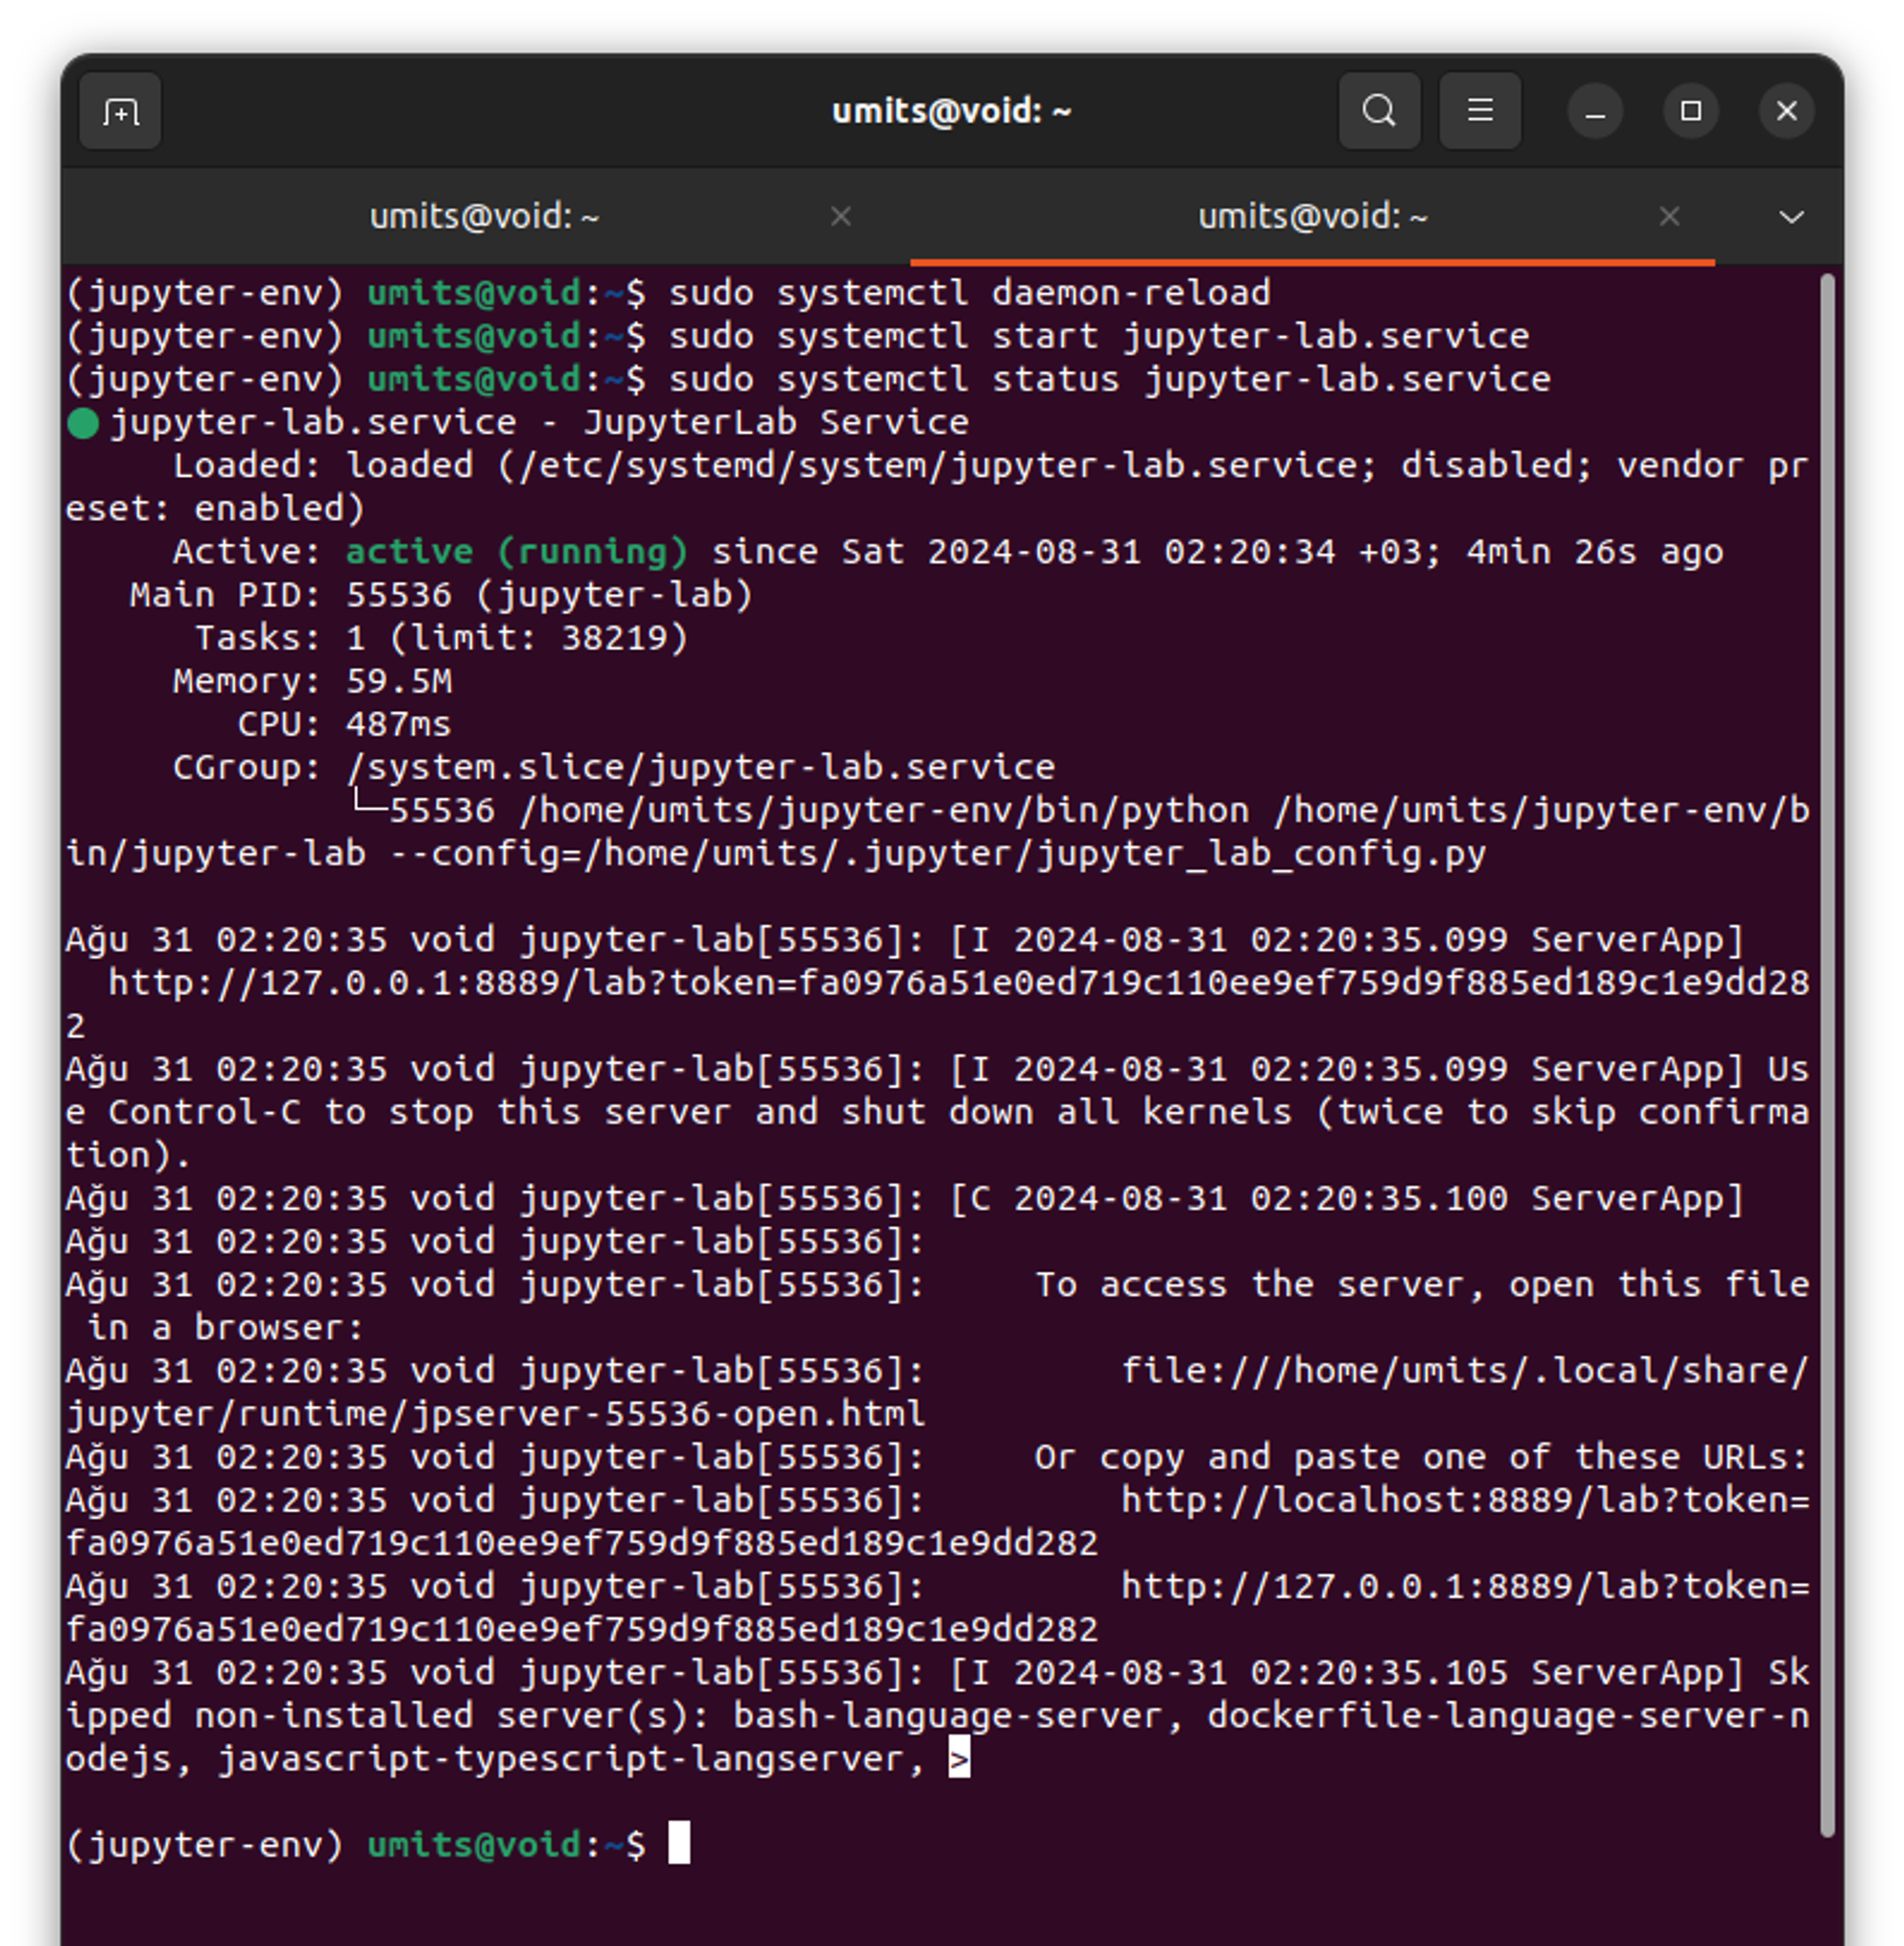 Figure 7
Voila! Another milestone is completed, I think this installation is enough for local development/projects. If you want to work remotely with your team/organization, you should add SSL certifi files and do remote port forwarding with nginx etc. There are many resources on the web 🙂 I might be update this post like included with them in the future.
Method 2: Dockerized JupyterLab Setup
If you want a simpler setup that avoids managing dependencies and conflicts, you can containerize JupyterLab using Docker. Docker allows you to run JupyterLab in an isolated environment, making it easier to install, manage, and share.
- Step 1 — Check updates
sudo apt update - Step 2 — Install docker
sudo apt install docker.io - Step 3 — Install docker-compose
sudo apt install docker-compose - Step 4 — Create
docker-compose.ymlfile - Step 5 — Run
docker-compose up -dand you can reach your JupyterLab localhost:8889
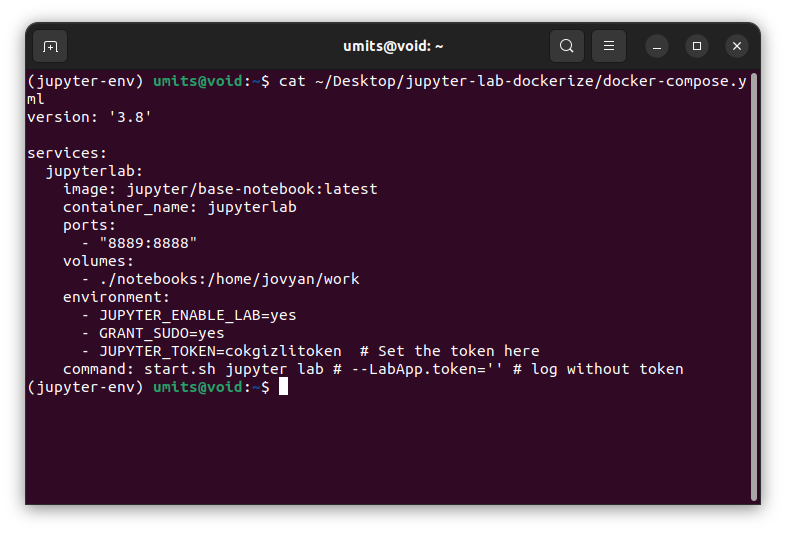 Figure 8
1
2
3
4
5
6
7
8
9
10
11
12
13
14
15
16
version: '3.8'

services:
  jupyterlab:
    image: jupyter/base-notebook:latest
    container_name: jupyterlab
    ports:
      - "8889:8888"
    volumes:
      - ./notebooks:/home/jovyan/work
    environment:
      - JUPYTER_ENABLE_LAB=yes
      - GRANT_SUDO=yes
      - JUPYTER_TOKEN=cokgizlitoken  # Set the token here
    command: start.sh jupyter lab # --LabApp.token='' # log without token
JupyterLab Installation: Manual vs. Dockerized
Manual Installation: Full Control and Flexibility
Manual installation of JupyterLab offers full control over your environment. You can customize every aspect of the setup, ensuring that it fits your specific needs. With direct access to system resources, you can optimize performance and integrate seamlessly with existing applications. Additionally, there’s no additional overhead from container layers, which can make it more efficient in certain scenarios.
However, managing dependencies manually can be complex, leading to potential conflicts between packages. This setup also poses a higher risk of version clashes and makes it harder to isolate different environments, which can complicate the management of multiple projects.
Dockerized Setup: Convenience and Consistency
A Dockerized setup provides an isolated environment that prevents dependency conflicts, making it easier to manage different projects without worrying about package clashes. Sharing and deploying JupyterLab across various machines becomes straightforward, and managing versions and updates is simplified with Docker. Furthermore, Docker’s ability to scale with multiple containers can handle increased workloads efficiently.
On the flip side, containerization introduces a slight performance overhead compared to a native installation. Additionally, you’ll need to have some knowledge of Docker and Docker Compose to set things up and maintain the environment. Also, direct access to system resources, like hardware acceleration, is limited within containers, which might impact performance for specific tasks.
Choosing between manual installation and a Dockerized setup depends on your needs for control versus convenience, performance versus isolation, and the complexity you’re willing to manage.
Conclusion
JupyterLab is a versatile tool that provides an interactive computing environment for data science, machine learning, and research. Depending on your needs, you can set it up manually or in a Dockerized environment.
Manual Installation: This is a good choice if you want more control over your environment and don’t mind managing dependencies manually. However, it can be complex and may require extra care when dealing with dependencies or configurations.
Dockerized Setup: This is the best choice for isolating your JupyterLab environment and ensuring that it runs consistently across different machines or setups. It’s easy to share with others and avoids dependency conflicts. However, it does add some overhead, such as managing Docker and storage.
Whichever method you choose, JupyterLab is an indispensable tool for modern computational workflows. By providing an all-in-one interface for coding, documentation, and visualization, JupyterLab continues to empower developers, data scientists, and researchers to explore their data and share insights effectively.