Guide to Installing Apache Cassandra on Ubuntu
Installation of apache cassandra on linux(ubuntu) machine with docker and debian packages.
In this tutorial, we will try to follow original documentation.There still might be different codes a bit 🙂 According to documentation you can install cassandra three different ways. In this post dockerize version and debiand package version is shown.
Method 1 - Docker Installation
Simple Setup
- Step 1 — Pull cassandra repository from docker hub
docker pull cassandra:latest - Step 2 — Run docker container
docker run —name cass_cluster cassandra:latest - Step 3 — Use cassandra in the container
docker exec -it cass_cluster cqlsh
More Flexible but Complex Setup
You can install cassandra with docker-compose instead only docker commands. I write a docker-compose.yml file like below. Then run file docker-compose up -d to start my cassandra cluster system.
1
2
3
4
5
6
7
8
9
10
11
12
13
14
15
16
17
18
19
20
21
22
23
24
25
26
27
28
29
30
31
32
33
34
35
36
37
38
39
40
41
42
43
44
45
46
47
48
49
50
51
52
53
54
55
56
57
58
59
60
61
62
63
64
65
66
version: '3.8'

services:
  cassandra-dc1-node1:
    image: cassandra:4.0
    container_name: cassandra-dc1-node1
    environment:
      - CASSANDRA_CLUSTER_NAME=MyCluster
      - CASSANDRA_DC=Datacenter1
      - CASSANDRA_RACK=Rack1
      - CASSANDRA_LISTEN_ADDRESS=cassandra-dc1-node1
      - CASSANDRA_RPC_ADDRESS=0.0.0.0
      - CASSANDRA_BROADCAST_ADDRESS=cassandra-dc1-node1
      - CASSANDRA_SEEDS=cassandra-dc1-node1,cassandra-dc2-node1
    ports:
      - "9043:9042"  # CQL port
      - "7001:7000"  # Inter-node port
      - "7200:7199"  # JMX port
    volumes:
      - cassandra-data-dc1-node1:/var/lib/cassandra
    networks:
      - cassandra-network
    healthcheck:
      test: ["CMD", "nodetool", "status"]
      interval: 30s
      retries: 3
      start_period: 60s
      timeout: 30s

  cassandra-dc2-node1:
    image: cassandra:4.0
    container_name: cassandra-dc2-node1
    environment:
      - CASSANDRA_CLUSTER_NAME=MyCluster
      - CASSANDRA_DC=Datacenter2
      - CASSANDRA_RACK=Rack1
      - CASSANDRA_LISTEN_ADDRESS=cassandra-dc2-node1
      - CASSANDRA_RPC_ADDRESS=0.0.0.0
      - CASSANDRA_BROADCAST_ADDRESS=cassandra-dc2-node1
      - CASSANDRA_SEEDS=cassandra-dc1-node1,cassandra-dc2-node1
    ports:
      - "9044:9042"  # CQL port
      - "7002:7000"  # Inter-node port
      - "7201:7199"  # JMX port
    volumes:
      - cassandra-data-dc2-node1:/var/lib/cassandra
    networks:
      - cassandra-network
    healthcheck:
      test: ["CMD", "nodetool", "status"]
      interval: 30s
      retries: 3
      start_period: 60s
      timeout: 30s


volumes:
  cassandra-data-dc1-node1:
    driver: local
  cassandra-data-dc2-node1:
    driver: local


networks:
  cassandra-network:
    driver: bridge
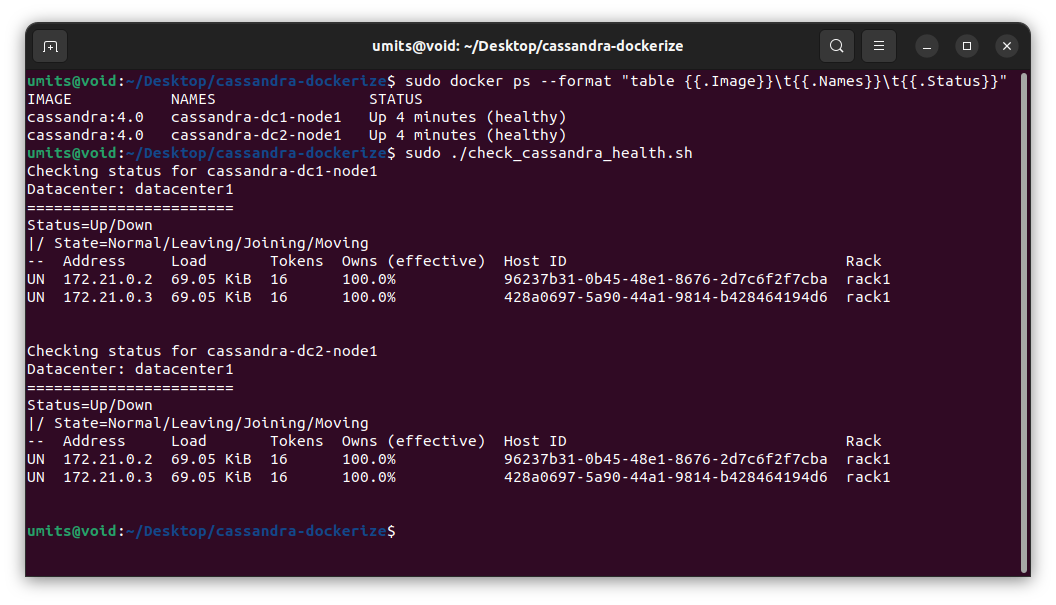
You can increase node numbers and connect these nodes to same or different racks. Also you can increase your data centers count. I tried to 2 dc, 2 node per dc, but my system can not work because of hardware issues. Let’s say you can compose up successfully, how can you know it is working right? You can look that this mini check_cassandra_health.sh script:
1
2
3
4
5
6
7
8
9
10
#!/bin/bash

# List of Cassandra containers
containers=("cassandra-dc1-node1" "cassandra-dc2-node1")

for container in "${containers[@]}"; do
  echo "Checking status for $container"
  docker-compose exec -T "$container" nodetool status
  echo
done
If you run this script sudo ./check_cassandra_health.sh, you should see stdout like in Figure 1.
If you show a langError, probably cassandra nodes are not up still. You just still a couple minutes, then try again.
 Figure 1.Docker Cassandra Setup Verify
Method 2- Debian Package Installation
First of all, there are some prerequisities so please verify and install them if you need
Step 1: Prerequisities Verification
sudo apt install default-jresudo apt install default-jdksudo apt install curlsudo apt-get update
After this verification and installation step, let’s continue to install cassandra.
Step 2: Add Cassandra Repository
sudo sucurl -o /etc/apt/keyrings/apache-cassandra.asc https://downloads.apache.org/cassandra/KEYSecho "deb [signed-by=/etc/apt/keyrings/apache-cassandra.asc] https://debian.cassandra.apache.org 40x main" > /etc/apt/sources.list.d/cassandra.listapt-get update
Step 3: Install Cassandra
apt install cassandra -y
Step 4: Setup Verification
Now, let’s check setup is done successfully sudo systemctl status cassandra. Also you can check your clusters health by nodetool status. Stdout should be like in Figure 2.
 Figure 2. Setup Verification
Step 5: Enable Service & Configuration
To enable service for cassandra sudo systemctl enable cassandra should be run. There are some configurations like cluster_name, broadcast_address, seeds, CQL port, Inter-node port, JMX port ,listen_address etc. You can update these parameters in cassandra.yml. If you do not know where config file is, you can type sudo find / -name cassandra.yaml. For example in my system, it is located in /etc/cassandra .
- Cluster name: Related nodes should be same cluster name.
- Seeds: A node’s discover range for other nodes
If cluster names are different, then nodes can not be connected each other properly when seeds are same.
Possible Bugs
- Your server locale should be en_US.UTF-8,
locale - Ports should be unused, you can check eg.
netstat -tulnp | grep 7199 - Ports can be allowed,
ufw allow 7199/tcp
